You’ve chosen the Builder Path
| « PREV | NEXT » |
A reasonable choice.
Perhaps the idea of coding your own particle effects seems uninteresting or even a bit daunting to you. That’s perfectly understandable, though! Coding requires a specific style of thinking and a technical aptitude, it certainly isn’t for everyone. But if that’s the case, there still remains a tiny amount of Lua script needed to use this plugin, even if you do not intend to code your own effects from scratch. Fortunately, it’s so trivial that if you were able to figure out TRLE building, specifically altering the [Level] script (e.g. setting custom Puzzle and Key items), you will have absolutely no issues with learning this either.
A builder makes use of module scripts created and shared by other users in the community and integrates them into personal projects. Module scripts contain the Lua code needed to implement an effect, but as a builder, you do not need to understand any of it. You simply place the ready-to-use module script files inside a dedicated folder in the TRLE project, then import chosen modules into the level in a specific, yet very simple and intuitive process.
The Builder Path explains the intricacies of using this plugin as a builder. Nothing to be afraid of, you’ll be able to add particles to your levels in no time!
Sections
2. The particle system
3. What kinds of particles this plugin supports
4. The two user interfaces
How to use this plugin?
The base requirement for this plugin is using it with the TRLE/TRNG engine (Tomb Raider Next Generation by Paolone), with TRNG version 1.3.0.7. The plugin must be installed correctly in the TRLE project.
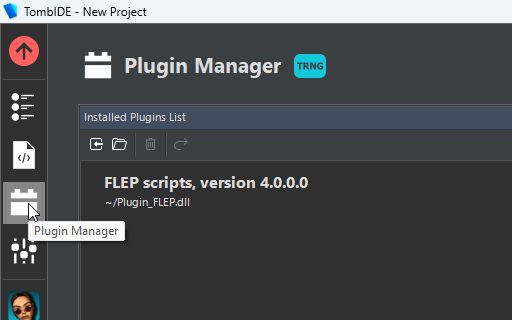
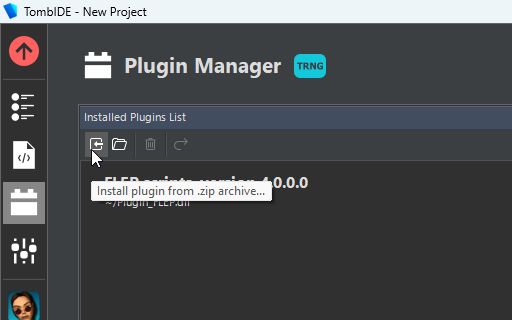
If using the TombIDE project manager from the Tomb Editor suite, you install the plugin via the Plugin Manager tab by clicking the Install plugin from .zip archive button and selecting the downloaded Plugin_ParticleSystem.zip archive in the file explorer window.
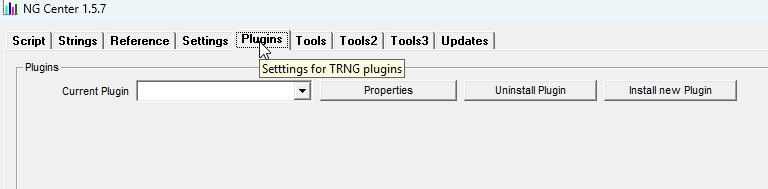
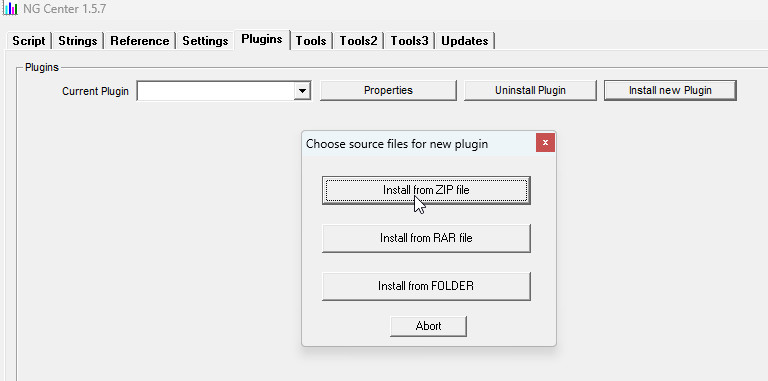
If using NG Center, you install it by going to the Plugins tab, clicking Install New Plugin, choosing the Install From ZIP file option and selecting Plugin_ParticleSystem.zip in the file explorer.
If the installation was successful, you are ready to use this plugin.
The particle system
We should start off by answering the pressing question – what IS a particle system?
I won’t be sophisticated and come up with my own definition, I’ll just lazily quote the Wikipedia article on particle systems:
A particle system is a technique in game physics, motion graphics, and computer graphics that uses many minute sprites, 3D models, or other graphic objects to simulate certain kinds of “fuzzy” phenomena, which are otherwise very hard to reproduce with conventional rendering techniques – usually highly chaotic systems, natural phenomena, or processes caused by chemical reactions.Quite a mouthful. The key point to take away is that it is a technique where various phenomena are represented with numerous, individually simulated and rendered entities (e.g. sprites or 3D models).
What kind of phenomena could be represented by using particle systems? The Wikipedia article further continues:
(…) examples include replicating the phenomena of fire, explosions, smoke, moving water (such as a waterfall), sparks, falling leaves, rock falls, clouds, fog, snow, dust, meteor tails, stars and galaxies, or abstract visual effects like glowing trails, magic spells, etc. – these use particles that fade out quickly and are then re-emitted from the effect’s source.Okay, we now have a clearer picture of what kind of visual effects could be achieved with the use of a particle system.
How is this relevant to us?
The goal of the Particle System plugin is to add a method of implementing particle systems as described, where users can create their own simulated effects for TRLE levels, including but not limited to the phenomena listed in the latter quote. I must emphasize that particle effects aren’t just for looks and atmosphere, but can also be inseparable elements of gameplay. The plugin’s module interface provides the possibility to add ranged attacks to melee enemies, give Lara magic powers, set up deadly traps or to create new types of weapons to be used against baddies in combat.
As a builder who is not interested in developing custom effects, you will have less direct contact with the particle system than a module coder would. However, the modules leverage the particle system concept in order to implement custom particle effects in the TRLE engine, hence it is worth knowing regardless.
In this series of tutorials, I will give a builder-centric perspective on how to use custom modules in your TRLE projects. I believe it’s very easy to get the hang of it, but it does require some understanding of where modules should be installed and how to import them into your levels, so that is what we will be mainly focusing on.
What kinds of particles this plugin offers
The plugin supports two main “kinds” of particles, which are:
- Sprite particles – represented by 2D sprite textures taken from a sprite slot (DEFAULT_SPRITES, MISC_SPRITES, CUSTOM_SPRITES)
- Mesh particles – represented by 3D meshes taken from any of the available moveable slots (except static slots and the aformentioned sprite slots)
Sprite particles are not only restricted to the 3D level map, they can also be rendered as a 2D overlay effect directly on the game screen, extending the idea of particles beyond what was possible in the classic TRLE engine!
That being said, one should not get too carried away by the new addition of custom particles. This engine cannot efficiently render many objects, as it cannot utilize today’s powerful GPU cards (high-res, high-poly graphics technology was unfathomable in the 90’s, when the engine code was written). Again, manage your expectations and do not anticipate the potential of Unity or Unreal Engine in the retro TRLE game engine.
The two user interfaces
There are two distinct, albeit connected scripting interfaces that come with using this plugin, reflecting the two user archetypes. These two interfaces are the:
- module script interface – for coders
- level script interface – for builders
The module interface is intended for coders of particle effects, who will use Lua scripting to build custom effects from scratch. After they write the necessary code, the .lua file, in which the effect is defined, will become an independent, reusable module. These modules can be placed in the folder modulescripts. This folder should be located inside the working directory of the TRLE project/levelset, alongside folders such as audio or data. In case of projects managed by TombIDE, this will be inside the Engine folder. Of course, if the modulescripts folder does not exist, it must be newly created (and it should be named modulescripts or ModuleScripts, mind the plural ‘s’ at the end). Any number of modules with user-made effects can be present in the modulescripts subfolder, the plugin places no restrictions.
The level script interface is designed for builders (that’s you!) who want to use effects from modules created by the coders. Each level file (.tr4) can be associated with any number of level script Lua files from the levelscripts subfolder. Note that just like modulescripts, this folder must be located in the same directory as the audio and data folders. It must be newly created, if it does not exist (LevelScripts is also accepted spelling, but it must match perfectly, with ‘s’ at the end). Linking level script files to levels is not mandatory – if there is no pairing between a level file and a script file, the level will still run as normal, however no custom effects shall be used for the given level.
Builders can import module scripts (installed in the modulescripts folder) into the level scripts, allowing to reuse the same effect(s) numerous times in across different levels. Furthermore, if the module coder provided Lua parameters for the module, builders are able to modify these parameters after importing said module. This is similar to using Customize or Parameters scripts in TRNG for some features, in the sense that it modifies chosen aspects of the imported effect. The only major difference is that it’s done through Lua scripting, instead of TRNG script.
After this short introduction, hopefully you have a better understanding of what the Particle System Plugin is meant to accomplish for you as a level builder, and that you will be able to use modules implementing various particle-based effects, developed by coders. In successive chapters, we will dive into the practicals of using this plugin’s module system – installing modules, importing them into levels, module customization (if customizable parameters were provided by the module coder) and how to protect the integrity of modules used in your project (preventing players from cheating and softlocking themselves). Onwards we go!
| « PREV | NEXT » |